how to remove the semi-permanent with clip SOAK OFF
09:302. Prendi un dischetto struccante, taglialo a metà e imbevilo di un solvente apposito. Appoggialo sull'unghia e incarta il tutto con della stagnola.
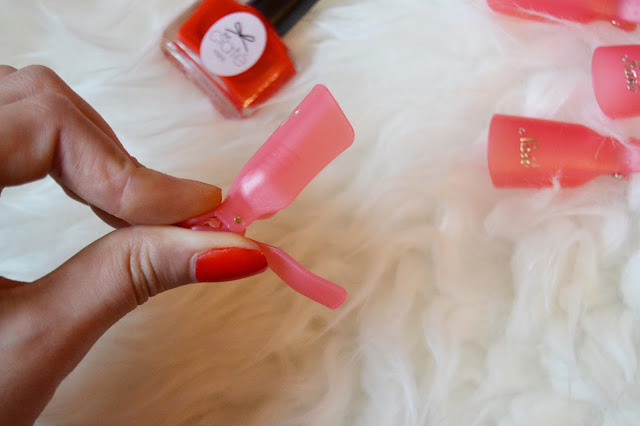
3. Fai lo stesso procedimento per tutte le dita. Parti dalla mano con la quale sei meno pratica, in questo modo ti sarà più facile applicare sull'altra mano quando una sarà già fatta. Lascia in posa l'impacco per almeno 15 minuti. È possibile in alternativa adoperare apposite vaschette da riempire con il solvente in cui immergere le dita, o ancora dei particolari ditali da riempire con l’acetone, ma sconsiglio queste ultime due soluzioni perché comportano uno spreco del prodotto solvente, dovendone usare in grosse quantità. Io in questo caso ho usato i Cappucci a molla ideali per la rimozione dello smalto semipermanente. Imbevi un pad con il Remover specifico e posizionalo sopra l'unghia, poi apri il cappuccio a molla e inseriscili sull'estremità del dito. Così facendo, potrai rimuovere lo smalto gel in modo semplice e veloce, proteggendo la pelle dal contatto con il liquido.
Riutilizzabili e Disinfettabili.
4. Passato il tempo di posa l'acetone penetrando nello smalto lo avrà ammorbidito, libera un dito alla volta e con un bastoncino d'arancio elimina i residui di smalto in gel.
5. Infine con una lima di cartone lima la superficie dell'unghia, passa un olio rinforzante e sei pronta per la prossima "infornata"!
I Cappucci a molla li trovate su amazon , ebay, e in qualsiasi sito.
How to take away the enamel semi-permanent at home without ruining your nails? Follow all the steps! You can do it even alone and staying at home, following the steps, step by step to avoid damaging your nails and get a professional result! What you'll need are: cotton, aluminum foil, a file, and a cuticle pushers. It is very important to follow all the steps carefully, so we urge you to take at least 15 minutes without haste, all for you. The semi-permanent polish is removed in four steps: it starts with the filing of the glossy surface layer of the nail and then proceed with the application of acetone proper installation and commissioning of the solvent with foil on the nails. Finally we go to the removal, with cuticle pushers, the remaining color.
1. File the nail surface lightly, no need to go crazy, or shave too deeply. Just remove the "gloss" layer so as to allow acetone to penetrate into the enamel.
2. Get a makeup remover disk, cut it in half and imbevilo of an appropriate solvent. Place it on the nail and papers all with foil.
3. Do the same process for all the fingers. Parts of the hand with which you are less practical, in this way it will be easier to apply on the other hand when one is already done. Leave on the wrap for 15 minutes. You can alternatively use the appropriate compartments to be filled with the solvent in which to dip the fingers, or even of the particular thimbles to fill with acetone, but do not recommend the latter two solutions because they lead to a waste of the solvent the product, it will have to use in large quantities. I in this case I used the Caps to ideal spring for the semi-permanent polish remover. Imbevi a pad with the specific Remover and place it over the nail, then open the spring-loaded cap and insert them on the end of the finger. By doing so, you can remove the gel polish in a simple and fast, protecting the skin from contact with the liquid.
Reusable and Disinfectable.
4. After the exposure time penetrating the acetone in the enamel will have softened him, frees one finger at a time and with an orange stick removes polish residues gel.
5. Finally the surface with a nail file to file cardboard, passes a strengthening oil and you're ready for the next "fired"!


0 commenti